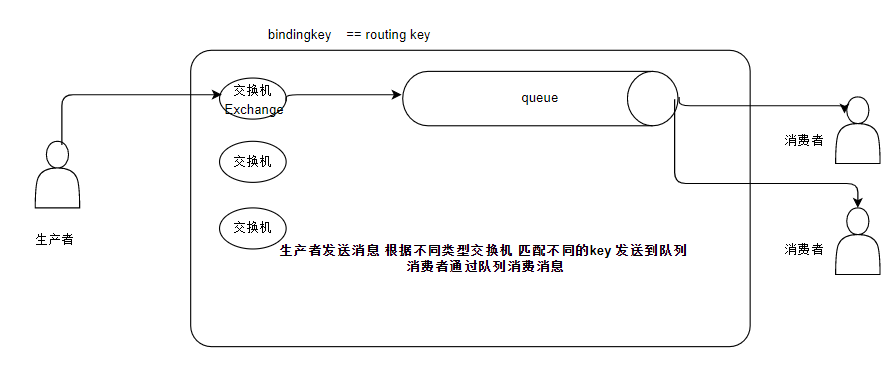
AMQP协议
AMQP,即Advanced Message Queuing Protocol,一个提供统一消息服务的应用层标准高级消息队列协议,是应用层协议的一个开放标准,为面向消息的中间件设计。基于此协议的客户端与消息中间件可传递消息,并不受客户端/中间件不同产品,不同的开发语言等条件的限制。Erlang中的实现有RabbitMQ等。
RabbitMQ
rabbitmq就是一个支持amqp协议的消息中间件 ,主要以 交换机(Exchange)、队列(queue)、 消息(Messages)、路由(routing key) 组成. 交换机呢又分为directExchange、 fanoutExchange 、headersExchange、 topicExchange 这几种
- direct: 分发到完全匹配 路由key的所有队列
- fanout: 分发所有交换机数据到所有队列
- headers: 分发消息通过headers属性匹配的到队列
- topic: 与direct类似 只是路由匹配规则不同
topic key eg:A.B.C 、A*.B 、A#B ……等等类似

spring rabbitmq 启动原理
springboot启动会加载META-INF 下的spring.factories文件对其中的部分类自动注入 , 其中包括RabbitAutoConfiguration ,对rabbitmq的连接工厂 rabbitTemplate amqpAdmin 等 进行bean注入
org.springframework.boot.autoconfigure.EnableAutoConfiguration=\
...
org.springframework.boot.autoconfigure.amqp.RabbitAutoConfiguration,\
...
rabbitmq 使用
通过RabbitProperties类可以查看spring提供了哪些配置给我们使用,例如下面几个。
spring:
  rabbitmq:
    host: 192.168.118.134
    port: 5672
    username: admin
    password: 1
    virtualHost: /HOST
交换机队列绑定
我们知道rabbitmq自动注入时候会自动注入个amqpAdmin()类 该类同时实现了InitializingBean 所以, bean初始化时候会调用afterPropertiesSet()方法 。
public class RabbitAdmin implements AmqpAdmin, ApplicationContextAware, ApplicationEventPublisherAware,
		BeanNameAware, InitializingBean
查看该方法实现关键点 会在这里向连接工程添加添加监听器,在连接rabbitmq服务时候会调用initialize()
final AtomicBoolean initializing = new AtomicBoolean(false);

			this.connectionFactory.addConnectionListener(connection -> {

				if (!initializing.compareAndSet(false, true)) {
					// If we are already initializing, we don't need to do it again...
					return;
				}
				try {

					if (this.retryTemplate != null) {
						this.retryTemplate.execute(c -> {
							initialize();
							return null;
						});
					}
					else {
						initialize();
					}
				}
				finally {
					initializing.compareAndSet(true, false);
				}

			});
继续查看 initialize()方法 该方法会从spring bean工厂中获取Exchange Queue Binding 这三个类型各自的集合 并将其在rabbitmq服务上创建 绑定 。
public void initialize() {

		......
		Collection<Exchange> contextExchanges = new LinkedList<Exchange>(
				this.applicationContext.getBeansOfType(Exchange.class).values());
		Collection<Queue> contextQueues = new LinkedList<Queue>(
				this.applicationContext.getBeansOfType(Queue.class).values());
		Collection<Binding> contextBindings = new LinkedList<Binding>(
				this.applicationContext.getBeansOfType(Binding.class).values());

		processLegacyCollections(contextExchanges, contextQueues, contextBindings);
		processDeclarables(contextExchanges, contextQueues, contextBindings);
		 .......
		this.rabbitTemplate.execute(channel -> {
			declareExchanges(channel, exchanges.toArray(new Exchange[exchanges.size()]));
			declareQueues(channel, queues.toArray(new Queue[queues.size()]));
			declareBindings(channel, bindings.toArray(new Binding[bindings.size()]));
			return null;
		});
	}
这样我们就可以同过@bean的方式 创建交换机 对列 及绑定关系
@Configuration
public class Rabbitconfig {
    //交换机
    @Bean
    public Exchange topicExchange()
    {
        return  ExchangeBuilder.topicExchange("Mytopic").build();
    }
    //队列
    @Bean
    public Queue myQueue(){
    return   QueueBuilder.durable("MyQueue").build();
    }
    //绑定关系
    @Bean
    public Binding myBinding() {
        return BindingBuilder.bind(myQueue()).to(topicExchange()).with("").noargs();
    }
}
发送消息
发送消息一般使用rabbitTemplate来发送,通过指定交换机,路由key 以及一个消息类实例org.springframework.amqp.core.Message 其中Message实际是一个被封装起来的byte[] body 字节数组。
@Autowired
    RabbitTemplate rabbitTemplate;

/**交换机为Mytopic 路由key为空 发现消息*/
public String testsend(){
        rabbitTemplate.send("Mytopic","",new Message(("helloworld"+UUID.randomUUID()).getBytes(),new MessageProperties()));
        return "ok";
    }
接受消息
接受消息spring提供了@RabbitListener注解 ,该注解可在类和方法上使用, 在方法上使用时 调用该方法处理消息 ,在类上使用是 配合@RabbitHandler 根据MessageConverter转换类型选择处理方法。
@RabbitListener(queues={"MyQueue"})
public class RabbitMqClient {

    @RabbitHandler
    public void testreceive(Message message){
       System.out.println("testreceive:"+message.getBody());
    }
     // @Payload  @Headers 注解可以直接获取消息 和头信息
     //头信息 就在 发送时候的MessageProperties中
     //private final Map<String, Object> headers = new HashMap<>();
    /*@RabbitHandler
    public void testreceiveA(@Payload String body, @Headers Map<String,Object> headers){
        System.out.println("testreceiveA:"+body+"-----"+headers);*/
    }
}